Friday, October 15, 2010
Character Expressions
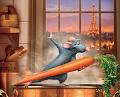
Here are a bunch of expressions I made today that will soon allow my character to talk! (Except that right now, it refuses to work...) =/

Wednesday, October 13, 2010
3D Production II
I've been meaning to update this for weeks, and now the semester is almost halfway through. In any case, I had the summer to decide my concentration in the CADA program, and opted for the 3D track. People often mistake this to mean the 3D projection technology that is becoming more prevalent in the movies and on television, but that is not really the case. 3D animation in relation to 2D is like the difference between Pixar and Dreamworks animation and hand-drawn Disney animation. I model in 3D space rather than draw on flat paper.
(Of course, that is a slightly antiquated analogy. 2D work today means a lot of graphic design work in broadcasting and actual film shooting).
That being said, 3D Production II builds (a lot) on the basic skills I learned last semester and implements them on a semester-long project. Essentially, we are learning how the production pipeline works in terms of 3D animation, starting with storyboards and ending with rendering. In between, you need to model, texture, layout the cameras, deform, rig...the list goes on. The basic idea is to create 30 second short in which a character emerges from a container and juggles, then does something with the objects it is juggling.
Since I am incapable of keeping my life simple, I decided on a coachman who pops out of Cinderella's carriage and juggles glass slippers which then break and, in a puff of smoke, turn the coachman and carriage into a mouse in a pumpkin.
So, here are some test renders of my project, from Week 1 to the present. Enjoy.
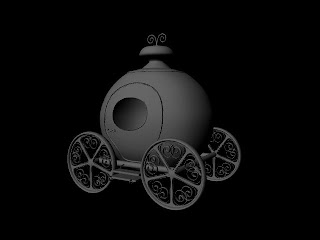
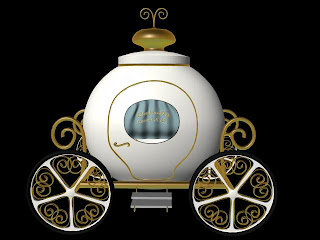
Models of Cinderella's carriage, before and after texturing.
Mouse: original model, with a UV map, and textured.
The UV map allows you to see where certain parts of a texture (a file imported from Photoshop, for example) will end up on your model. UVs can be confusing because they originate from vertices on a model's geometry, but they are independent points that move the texture over the geometry (not the geometry itself). Get it??


The mouse in his house:

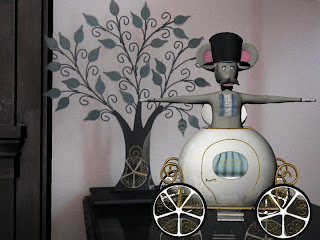
Next the models have to be put "in" a scene. In this case, I took a digital photograph in my apartment brought it into Maya as an image plane, and created a camera that I then matched to the photograph's perspective. Then I build additional objects to receive reflections and cast shadows. Here's the stock photo and the one with blocking:


Finally, models inserted into the scene. This is rendered using mentalray, which is where the reflections come from.
None of this stuff moves yet, so stay tuned for a talking, juggling mouse...
(Of course, that is a slightly antiquated analogy. 2D work today means a lot of graphic design work in broadcasting and actual film shooting).
That being said, 3D Production II builds (a lot) on the basic skills I learned last semester and implements them on a semester-long project. Essentially, we are learning how the production pipeline works in terms of 3D animation, starting with storyboards and ending with rendering. In between, you need to model, texture, layout the cameras, deform, rig...the list goes on. The basic idea is to create 30 second short in which a character emerges from a container and juggles, then does something with the objects it is juggling.
Since I am incapable of keeping my life simple, I decided on a coachman who pops out of Cinderella's carriage and juggles glass slippers which then break and, in a puff of smoke, turn the coachman and carriage into a mouse in a pumpkin.
So, here are some test renders of my project, from Week 1 to the present. Enjoy.
Models of Cinderella's carriage, before and after texturing.


Mouse: original model, with a UV map, and textured.
The UV map allows you to see where certain parts of a texture (a file imported from Photoshop, for example) will end up on your model. UVs can be confusing because they originate from vertices on a model's geometry, but they are independent points that move the texture over the geometry (not the geometry itself). Get it??


The mouse in his house:

Next the models have to be put "in" a scene. In this case, I took a digital photograph in my apartment brought it into Maya as an image plane, and created a camera that I then matched to the photograph's perspective. Then I build additional objects to receive reflections and cast shadows. Here's the stock photo and the one with blocking:


Finally, models inserted into the scene. This is rendered using mentalray, which is where the reflections come from.

None of this stuff moves yet, so stay tuned for a talking, juggling mouse...
Tuesday, May 4, 2010


Friday, April 16, 2010
Maya Animation
Motion in Maya! Finally--!
This is a 'playblast' of my bouncing ball project and not a proper render. The actual render would show the floor as wood planks, not a weird blurry brown thing...Also, the sound isn't synched very well in this example, but you get the idea.
This is a 'playblast' of my bouncing ball project and not a proper render. The actual render would show the floor as wood planks, not a weird blurry brown thing...Also, the sound isn't synched very well in this example, but you get the idea.
Monday, April 5, 2010
Space Room Update
Here's a quick update of the scene I'm working on in Maya. The markers I posted previously are sitting on the desk. =)


Thursday, March 11, 2010
3D Experiments
Here are some rendered images from a project I'm working on for 3D I. The EXPO markers on the desk are complete and the most detailed, while the scene I'm building around it is a work in progress..... It's being done in Maya.


Thursday, March 4, 2010
Rotoscoping
In a quest to revolutionize animation aesthetics and often tedious production processes in the early days of cinema, competing animation studios developed popular characters and new technologies to create smoother motion and synchronized sound. As Disney's near-total domination of the American market has allowed it to partially re-write history, credit for the first synchronized sound cartoon often goes to "Steamboat Willie," also erroneously labeled as the first to feature Mickey Mouse. However, it was Disney's stiffest competition, the Fleischer Studios, that pioneered the technology behind 'Car-Tunes,' in which the bouncing ball was debuted in theater sing-a-longs; and rotoscoping, in which a character is drawn over live action footage.
The first character to be rotoscoped--over footage of Max Fleischer's brother, Dave--was KoKo the Clown, who starred in the 'Car-Tunes' series and got his start in the popular "Out of the Inkwell" shorts in 1919. He was also seen in cartoons starring Betty Boop, one of the more popular characters to emerge from Fleischer Studios. In addition to KoKo, several of Boop's cartoons are notable for using rotoscope over film of American jazz artist, Cab Calloway. Calloway performed the songs, "Minnie the Moocher," "St. James Infirmary Blues," and "The Old Man Of the Mountain," specifically for the Boop shorts; "Moocher" became his most famous recording, seen below in Fleischer's version of "Snow White." The dance steps of the ghost are traced from Calloway's signature moves.
Apart from creating fluid animation, rotoscoping also acts as a kind of mask for live action film that allows individual components to be isolated from the remainder of the frame. This is perhaps its most common use today; my instructor counted at least 90 instances of rotoscoping during this year's Super Bowl broadcast. However, it remains incredibly time consuming. This ten second clip, of Gene Kelly in "Singing in the Rain," is comprised of 150 individual frames that took around 20 hours.
On the plus side, if you ever wanted to watch Gene Kelly dance on Jupiter, the Great Wall of China, or in the jungle, it is now entirely possible.
Wednesday, March 3, 2010
New Year, New Antics
Hello again!
Presently, I am halfway through my second semester at NYU-CADA, and have probably set several new standards for inefficient blogging. (Poor time management skills.) However, I hope to make up for some of that lost time now by covering a few of the projects that have been keep me occupied lately.
My two classes this time around are 2D Tool Sets and 3D Tool Sets. Primarily, I am dealing with one program for each class: AfterEffects and Maya. As detailing Maya and 3D space requires lots of technical terms like "polynomial expressions," which continue to give me a headache, I am going to skip it for now.
In an ideal world, I would have taken 2D last semester when I was struggling to work with AfterEffects for "Picture Window." I have been working almost entirely in AE for this class, occasionally importing files from Photoshop. The work thus far has been mastering keyframes, which enable you to chose a point on a timeline and assign various values to the footage. There are five properties: anchor point, position, scale, rotation, and opacity. In addition, AE's many effects functions each contain variations on these properties, resulting in an infinite set of adjustments to the layers in a composition. In "Picture Window," each individual shape that falls into place to build the waves, ark, and sky, has at least two keyframes that tell the shape where to start and end. (Or in my case, end and start, as I worked backwards and played it forward.)
However, you may find this bobblehead-version of myself as Grace Kelly a more amusing example. My movements between scenes are position and scale keyframes, and the bobbing is done using a set of rotation keyframes that have been put on a loop using Javascript code. Sorry for the pixellation--I had to cut the video dimensions in half to upload it.
More to come on rotoscoping later this week!
~J
Subscribe to:
Posts (Atom)